Complete Guide to Setting up iCloud

icloud

iCloud refers to a collective term for all the services provided by Apply via the net. iCloud works on multiple platforms such as Mac, iOS, and Windows. Some of the services that are included in the iCloud are iCloud Drive, Photo Library, iTunes Match, and Apple Music. In iCloud, iDevice owners can store their pictures, videos, files, songs, applications, etc. and synchronize them across different gadgets. File sharing becomes a lot easier with iCloud. The icing on the cake is that, if one loses or misplaces their iPhone, iCloud helps the user in locating it.

Now, whether you just received a new iPad this Christmas as a gift or are a first time Apple device owner, you can easily set up iCloud on your device. Just follow the process given in this blog, and set up iCloud on your iPhone, iPad, Apple TV, Mac, or Windows system.

Begin with Creating an Apple ID

The iCloud accounts are based on Apple IDs. If a user already has one, then they do not have to create a new one. Well, one can get an Apple ID while setting up their iOS devices. They can also use browsing software to create one.

During the setup of a brand new iOS device, one merely has to select the option for creating an Apple Id, enter the information and be done. Or else, simply navigate to the Apple’s website and make a new ID from there.

Install all updates

The company strongly suggests the users ensure that their iOS or Mac devices have an updated operating system. iOS users can open the settings application, and tap on General. After that, select Software Update. If any new version is available then just complete its download and installation.

Apple TV owners can launch the Settings application, navigate to the System option, and then go to the Maintenance section to choose Software updates. Follow the prompts on the screen to complete the update process.

In order to update Mac, just press the Apple logo located at the upper left-hand edge and choose About This Mac. Now, press Software Update. Follow the instructions on the screen.

Switching on iCloud on iDevices

Turn on iCloud on is quite simple. Similar to the sign up process for Apple IDs, one can do this while setting up their device or anytime after the setup.

When the users are setting up their iOS device, they will be asked if they wish to use iCloud. After selecting Use iCloud option, they will have to enter their Apple ID credentials and follow the on-screen prompts.

Those who failed to turn on iCloud while setting up the device need to open Settings. Press the Apple Id located at the top and select iCloud. Follow the prompts on the screen.

Switching on iCloud on Apple TV

It is quite simple to set up iCloud on Apple TVs. When the users turn on their Apple TV, they shall be required to enter their Apple ID credentials. If they fail to do so, then they need to go to Settings and select Accounts. After that click on iCloud and choose Sign in.

Switching on iCloud on Mac

  1. Launch System Preferences.
  2. Select iCloud.
  3. Now, log on with the Apple ID.
  4. Mark the iCloud services you wish to make use of.
  5. Click on Apply.

Setting up iCloud on Windows

  1. Firstly, you need to get iCloud for Windows by downloading and installing it.
  2. Reboot the system.
  3. Now, launch iCloud for windows by going to the Apps.
  4. Key in the Apple ID for logging in.
  5. Select the features and services you wish to update across multiple platforms.
  6. Hit the Apply button.


Karen Minton is a Microsoft Office expert and has been working in the technical industry since 2002. As a technical expert, Karen  has written technical blogs, manuals, white papers, and reviews for many websites such as office.com/setup  .
How to Turn Off Windows Taskbar on the Second Display?


windows

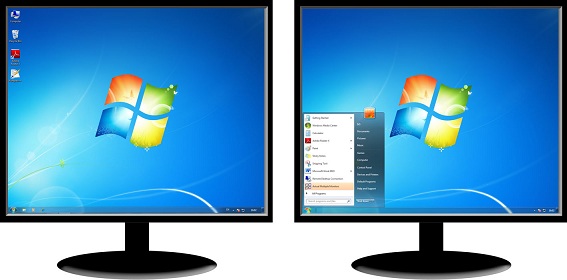
Do you have a dual monitor setup and want to use the second screen for presenting something? In case, if you are presenting something, keep it on your mind that Taskbar is completely necessary and is not required. Sometimes, when you are using your computer system and don’t want the taskbar on your second screen, then you have to follow below-given steps for doing so.

However, Windows comes with this feature built into it that allows you to disable the taskbar on second screen or projector connected to your computer system. Below we will guide you how to remove or hide the taskbar from the second monitor in the Windows 10 computer system. If you are using multiple displays and projectors, then this is a very useful tip.

Steps to Disable Windows Taskbar on the Second Display

The process is very easy, and you can get rid of the taskbar on your second screen within a minute, but to make it easier you need to follow the steps in an exact sequence. Here how to do it:

  1. Launch the Settings
  2. Then, click on the taskbar appears on the left-side of the menu.
  3. Scroll down the window to find out Multiple Display option.
  4. After that, turn off the toggle which says ‘Show taskbar on all displays.’

By doing this will help you in disabling taskbar on all secondary displays. Always remember that these settings will only work if you are running the second screen in extended mode. However, if you are using Duplicate mode, this setting won’t work, but you can set your taskbar to Autohide so that it is not displayed.

If you are unable to find out which screen is primary and which one is secondary, then you need to follow these steps:

  1. Firstly, open the ‘Settings’ and then navigate to the ‘System’ option.
  2. Now, launch ‘Display’ option from the left side of the menu.
  3. Then, choose the desired display and make it your primary display as required by your setup.
  4. After you completed the process, now you are finding out primary and secondary screen.

Disabling the taskbar on the second screen has its own perquisites. Thus it is a perfect setup if you are using the second screen for the presentations. The above mentioned steps are simple and also self-explanatory.


Karen Minton is a Microsoft Office expert and has been working in the technical industry since 2002. As a technical expert, Karen  has written technical blogs, manuals, white papers, and reviews for many websites such as office.com/setup   .
Microsoft Rolls Out Windows 10 December ‘Patch Tuesday’ Updates

office.com/setup
office.com/setup


Microsoft has just released December “Patch Tuesday” collective updates for Windows 10, 1809, 1803, and some other previous supported versions of Windows and Sever. However, Microsoft pushing out updates on a regular basis for Windows 10 and the list of bug fixes and security improvement is not very long. Here what users expect with this update

Windows 10 1809 October 2018 Update

Users who are running Windows 10 1809 version received a big update last week with KB4469342 which included more fixes than today’s update. However, there are no any latest features to report, but this update does include a pair of under the hood updates and will strike your build to 17763.194. Here know about what is included in KB4471332:

  • Address an issue which might stop you from the use of the Seek Bar in Windows Media Player when playing some particular files. Thus, this issue does not affect the normal playback.
  • Security Updates to the Windows Authentication, Microsoft Scripting Engine, Internet Explorer, Windows App Platform and Frameworks, Windows Storage and Filesystems, Windows Kernel, Microsoft Edge, and Microsoft Scripting Engine.

Windows 10 1803 April 2018 Update

All the Windows 10 1803 users will be knocked to Build 17134.471 and will get KB4471324 which include the following fixes:

  • They may address an issue which may stop them from using the Seek Bar in Windows Media Player when playing some specific files.
  • Addresses an issue which might cause users to see a blue screen or black screen and receive the error code which says; “System thread exception not handled.”
  • Address an issue which may cause some custom Start menu layouts to display inaccurately.
  • Address an issue directly with the Microsoft Intune which causes devices to be improperly marked as not compliant as a firewall incorrectly returns a ‘Poor’ status. Consequently, the affected devices will not receive any conditional access compliance authorization and it may be blocked from access to some corporate resources such as an

While some updates are available for the other supported versions of Windows 10, which you should get automatically in the next couple of days. Additionally, if you want you can check it manually by navigating to the Settings tab, then go to Update & Security, and finally move to the Windows Update option.

Moreover, there are two known issues are available in this update, so be aware from them:

  • August-September 2018 .NET Framework updates,
  • It stops some users from pinning a web link on the taskbar or Start Menu.

But don’t worry about it; Microsoft says that they will surely provide a fix for both issues in their next upcoming release.


Karen Minton is a Microsoft Office expert and has been working in the technical industry since 2002. As a technical expert, Karen  has written technical blogs, manuals, white papers, and reviews for many websites such as office.com/setup

How to Back Up your EFS Certificate and Key in Windows 10?

office.com/setup
office.com/setup

To create a back up of your encryption certificate and key gives you multiples of benefits; it helps you avoid permanently losing the access to your encrypted files & folders if in case you lose access to your user account. While the encryption certificate and key are tied to the local user account, and at the time, if you lose access to this account, then these files or folders will automatically become inaccessible. So this is where the backup of your encrypting file system certificate and the key comes in helpful, as by using this backup you can easily access the encrypted file or folders on the system.

Generally, the Encrypting File System (EFS) is the integral encryption tool in Windows which is used to encrypt all the files and folders on NTFS drives to protect them from unwanted access. However, EFS always enables transparent encryption and decryption of files of your user account by using the advanced standard cryptographic algorithms.

Here we will show you how to back up your EFS certificate and key in Windows 10 with the help of a complete stepwise guide.

Steps to Backup your EFS Certificate and Key in Windows 10

Before backing up your encrypting files system certificates and keys in your Windows 10 computer, we suggest you create a restore point and back up of all your files and data if in case something goes wrong.  Here how to do it:

Back Up EFS Certificates and Key in Certificates Manager

  1. Click Windows + R Keys together to open the Run command box.
  2. In the Run command box, type certmgr.msc and click the Enter key to open the Certificate Manager on your system.
  3. Now, click on the Personal option located on the left side of your window panel to expand it.
  4. Then, choose the Certificates
  5. In the right side of the Window panel, right- click on the “find the certificate that lists Encrypting File System under Intended Purpose.”
  6. Then, click on the “All Task” option and choose “Export” option.
  7. On the “Welcome to the Certificate Export Wizard” screen, click on the “Next to Continue option.
  8. After that, choose “Yes, export the private key” box.
  9. Then, click on the Next tab.
  10. Now, tick mark on the “Include all certificates in the certification path if possible” box.
  11. Again, click on the Next tab.
  12. Next, tick marks the “Password” box.
  13. Click to “Set a Password” and click on the Next tab.
  14. Now, click on the “Browse” button and then move to the location where you want to save the EFS Certificates and keys.
  15. Then, enter the chosen “File Name” for your backup.
  16. Click on “Save” button to save all settings.
  17. Once review all the changes you’ve done and then click on the Finish tab.

When the export has successfully finished, then click on the Ok tab to close the dialogue box.

Source Url :- https://offiice-setup.download/how-to-back-up-your-efs-certificate-and-key-in-windows-10/

Karen Minton is a Microsoft Office expert and has been working in the technical industry since 2002. As a technical expert, Karen has written technical blogs, manuals, white papers, and reviews for many websites such as office.com/setup

How to Cancel HBO Now Subscription on Windows or Mac System?

With Games of Thrones a year away, you may not want to use your HBO Now subscription. With HBO Now, the best thing is that you can subscribe when the latest season of your favorite TV series launches, and unsubscribe when it gets wrapped up. If you had subscribed to HBO to watch a particular movie or series, and it has ended, then you can simply unsubscribe it. Here is how you can cancel your HBO Now subscription through multiple platforms:

Google Play

  1. Open any internet browser on the system.
  2. Head on to the Google Play Webstore by going to the following link: play.google.com.
  3. Hit the blue Sign In button located at the upper right-hand side of the website.
  4. Key in the username and password for the Google account.
  5. Hit the Next button and log in.
  6. When you log in, click Account below the Devices segment.
  7. Now, next to HBO Now, you will find the Cancel Subscription button, click on it.
  8. When the billing cycle is over, your subscription will get terminated automatically.

iTunes

  1. Launch the iTunes application on your Mac.
  2. Enter the email and passcode linked with the Apple ID and sign in to the iTunes account, if you are not already signed in.
  3. After that, go to the menu at the upper portion of iTunes and select Account.
  4. From the pull-down list below the Account name, select View My Account option.
  5. When prompted, key in the password for the Apple ID.
  6. Scroll down to Subscriptions located in the Settings submit.
  7. Hit the Manage button.
  8. From all the iTunes subscriptions, select HBO Now.
  9. Scroll down and under the subscription information, hit the Cancel Subscription button.

Hulu

  1. Click on any internet browsing software on the system.
  2. Visit the official Hulu website and go to your account. Or just click on hulu.com/account.
  3. Key in the email ID and password for your Hulu account.
  4. Hit the Log in button to sign into the account.
  5. In the Your Subscriptions segment, locate Add-ons.
  6. Click on the Manage button.
  7. Now, go to Premium Add-ons.
  8. Locate HBO and hit the You Have This button.
  9. Click the Continue button when you are asked: “You want to remove this.”

Amazon Prime Video

  1. Go to the Amazon website.
  2. Enter the email id or phone number associated with the Amazon account.
  3. Hit the Enter button.
  4. Key in the password for the Amazon account and sign in.
  5. Click on Videos and select Subscription.
  6. Now, just hit the Manage button.
  7. In the list of all Amazon Channels, locate HBO Now.
  8. Click on Cancel Channels.
  9. Now, to cancel your HBO Now subscription, hit the Confirm button when prompted.

Roku

  1. Launch any web browser on the system.
  2. Go to your Roku account webpage or type in my.roku.com in the URL bar and hit enter.
  3. Enter the email ID and password for your Roku account.
  4. Click on the Sign in button located at the lower side of the page.
  5. Go to Manage your subscriptions.
  6. From the list of all subscriptions, locate HBO Now.
  7. Hit the Unsubscribe button next to HBO Now.

Source url :- https://www-mcafee-activate.com/how-to-cancel-hbo-now-subscription-on-windows-or-mac-system/

Karen Minton is a creative person who has been writing blogs and articles about cybersecurity. She writes about the latest updates regarding www.mcafee.com/activate and how it can improve the work experience of users. Her articles have been published in many popular e-magazines, blogs, and websites.

Blog at WordPress.com.

Up ↑

Design a site like this with WordPress.com
Get started